6. Build Digital to Analog Converter Using a
Commercial IC
The first task this week is to build a simple D/A convertor
and evaluate its performance. You will be using a DAC0808 (DAC0808 datasheet).Your
design should take 8 bits from the microcontroller (use the 8 8bits
on Port 0 of the AT89s51 as the input to the D/A convertor). The D/A
output should range from 0 to 5 volts. The lower 8 bits from the AT89s51
should go into the 8 bits from the DAC0808. Note: I expect you to try
to get the device to work by reading the datasheet and trying to understand
it, if you have trouble you should come see me, but I expect you to
have fairly specific questions that indicate you have put some thought
into the problem.

Figure 2.15. Pin Configuration DAC0808
Things to consider with the this design:
Figure 1 from page 4 of the DAC0808 datasheet is a
good place to start your design.
The pins are labeled A1 through A8, but note that A1 is the Most Significant
Bit, and A8 is the Least Significant Bit (the opposite of the normal
convention). Ground the two least significant bits.
The D/A convertor has an output current, instead of an output voltage.
The output pin should stay at about 0 volts. The op-amp on the "Typical
Application" on the datasheet converts the current to a voltage.
How does it do this?
The output current from pin 4 ranges between 0 (when the inputs are
all 0) to Imax*255/256 when all the inputs are 1. The current, Imax,
is determined by the current into pin 14 (which is at 0 volts). Note:
Since we are using 8 bits, the maximum value is Imax*255/256.
You'll need to modify the circuit given in the datasheet to get a full
scale range of 0 to 5 volts. Again, our output will be just under 5
volts. The output of the D/A convertor takes some time to settle. You
may need to take this in consideration when planning the timing of the
A/D conversion in later sections of this lab. Check the DAC0808 datasheet
for specs. The code below shows an easy way to send 8 bits to the output
of the microcontrollerr. You should probably test your code without
the D/A convertor separately to ensure that the microcontroller is behaving
as you expect.

Figure 2.16. Typical Application DAC0808
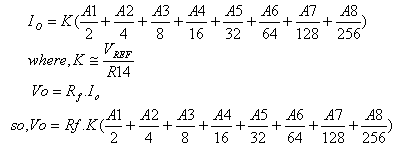
    Where, Rf = Feedback Resistor of Current to Voltage
                Converter circuit
6.1. Simple Experiment to Generate a Voltage from DAC
In this lesson we are like to design, how to generate
a voltage 2 volt from DAC0808. There is something you must to do is
to calculate the konstanta K, as you have learned in previous lesson.
Step 1st
Build the circuit as shown in figure 2.16. As you seen on figure 2.16.
P0.0 trough P0.7 is connected to A8 - A1.
or example, we assumes that the Vref = 5 volt, R14 = 5 k, and Rf = 5k
   K = Vref/ R14;
     = 5/5k
     = 1 mA
If, we put logic high into A1 through A8 then we have:
   Io = 1 mA x 0.99
      = 1 mA
So,Vo = Io x Rf
      = 1 mA x 5k
      = 5 volt
Voltage Resolution = 5/255 = 0.02 volt

If you like to send a 2 volt out from your DAC, than you
must write down this decimal
      = 2/0.02
      = 100 decimal
Step 2nd
In this step, you must tipe the assembly program to make a voltage from
your DAC, we assume that you have already known the editor, we used
MIDE-51 to edit the program.
       org 0h
start: mov A,#100
       mov P0,A
       sjmp start
Step
3rd
Safe your assembly program above, and name it with dac1.asm (for example)
Compile the program that you have been save by using MIDE-51, see the
software instruction.
Step 4th
Download your hex file ( dac1.hex ) into the microcontroller
by using Microcontroller ATMEL ISP software, see the instruction.After
download this hex file you'll see the action of DAC ( of course if your
cable connection and your program are corrected )
NEXT
|